Archive for July, 2012

SharePoint 2010 Caching Options

July 23, 2012

SharePoint stores most of the content it needs to serve up in the content database, so any time we can save a trip, we are helping the performance of our application.

So we will be examining the three types: BLOB cache, page output, and object cache. Page output and object cache require that you activate the ‘SharePoint Server Publishing’ feature located in the site features of your web site, so these will not be available to you if you are using SharePoint Foundation. BLOB caching, on the other hand, is available in the server product and will be where we start off.


BLOB Caching is a disk based cache. You configure it in the web.config file of the web site, which means that you will need to go to each WFE to set it up. Your web.config file is typically located at Local Disk:\inetpub\wwwroot\wss\VirtualDirectories\SiteFolder. Before making any changes to your web.config, you will need to back it up. It can be quite difficult to repair this file if you happen to make a mistake.

Inside the web.config file, find the following line:

<BlobCache location=”C:\BlobCache\14″ path=”\.(gif|jpg|jpeg|jpe|jfif|bmp|dib|tif|tiff|ico|png|wdp|hdp|css|js|asf|avi|flv|m4v|mov|mp3|mp4|mpeg|mpg|rm|rmvb|wma|wmv)$” maxSize=”10″ enabled=”false” />

If you are familiar with BlobCache from 2007, it works the same way. One nice thing about 2010, is that you get a very long list of file types that default to Blob cache as opposed to the previous version. I am going to save much of the explanation of Blob caching for the article written on TechNet: Plan for caching and performance. Once you have it set up, upload a few photos to a picture library and will see them populate the blob location.

In the root of your blob location, you will find a series of folders. Each of these folders represents the various web applications on your WFE. If you’re a little confused on which folder maps to which web site, simply check the Sites in your IIS Manager. The folder name is the Site ID.


In each of the sub folders is an additional folder and a file named currentcache.bin. If you rename the currentcache.bin file to a text file and open it up, you will see that it is the path referencing the cryptic named folder associated with it. Inside the cryptic folder, you will start to see the site structure of some of your content and additional bin files: change.bin, dump.bin, fulshcount.bin, filestodelete.bin, inprogressdump.bin, and oldcachefolders.bin.

change.bin: This file contains serialized change tokens (SPChangeToken) for objects being cached in the local file system.  These tokens allow the BlobCache maintenance thread to query the content source(s) and subsequently update the contents of the BLOB cache with any items that are identified as having changed since the last maintenance sweep.

dump.bin: This file contains a serialized copy of the BlobCache’s cache dictionary.  The dictionary maintains information for all objects being tracked and maintained by the BlobCache object; each key/value pair in the dictionary consists of a local file path (key) and its associated BlobCacheEntry (value).

flushcount.bin: This file contains nothing more than the serialized value of the cacheFlushCount for the BlobCache object.  Practically speaking, this value allows a BlobCache to determine if a flush has been requested while it was shutdown.


One of the changes from MOSS 2007 and SP2010, is that the files use to be stored with a .cache extension. They now have their original description. Another change that I noticed is that the ‘Disk Based Cached Reset’ is no longer available, but you are able to flush the object cache.


One thing I was expecting is that if I went into the file system and deleted the files from the cache directly, that they would be populated on the next request. This was not the case. Once deleted, the files were still visible on the site. I was thinking that SharePoint was now going back to the content database to get these file, but I was wrong. I started up an instance of Fiddler to see if I could find these requests. These files are now being rendered by the cache of my web browser. When I deleted my temporary files, I found that the image no longer rendered. I tried several different ways to repair my site. I used the ‘Object Cache Flush’ to see if it had any influence on the BLOB cache. It did not fix my issue. In fact, I had to go as far as deleting all of the .bin files and toggle the web.config file to get the image to render again with blob cache enabled.


In MOSS 2007, we had a property called max-age. It allowed you to specify how long cached content would be valid in you blob location. This was measured in seconds, so I attempted to enter a value of “60″ to force my image to go back to the database. I wanted to make sure there weren’t any leftover references, so I once again deleted the .bin files, my image and toggled my web.config. The image was recreated in the blob location with a time stamp of 2:11 PM. I expected to wait a few minutes and refresh the page and get a new item in the blob storage location. This was not the case.

I did find some interesting behavior while playing around with the image properties. I found that if you have an image stored in the blob location and then change one of the properties, the image was updated leading me to believe that the max-age no longer works, but the SharePoint team has obviously set flags to check if the file has any changes and then refreshes the file accordingly. You may also notice that your image may not render until your browser cache is cleared.

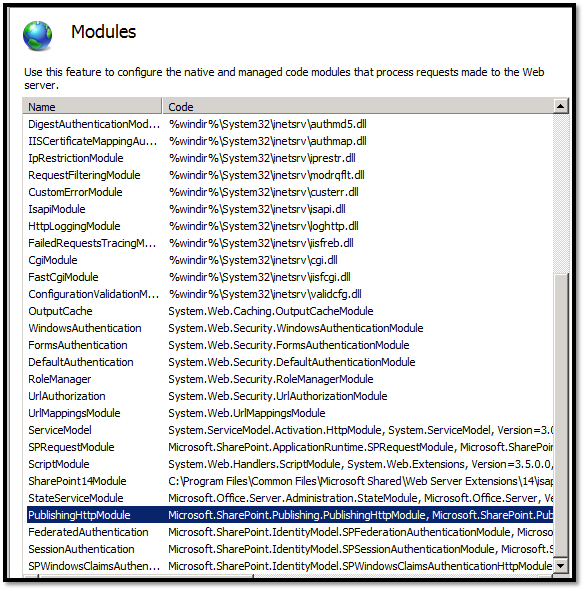
In my previous post, I mentioned the HTTPModules that get included in the HTTP request. While researching BLOB cache a little deeper, I found a very informative post by Sean McDonough, that states that BLOB cache is implemented by way of Microsoft.SharePoint.Publishing. This class is loaded in the PublishingHTTPModule. This means that while Blob cache does not require that publishing features be activated, it will not work in SharePoint Foundation. I went back to review the list of IIS modules to see where the PublishHTTPModule fell into the ordered list view. I have it highlighted in blue below.

As I mentioned in my previous post, the object and output cache options require you activate the ‘SharePoint Publishing Feature’ or as I like to call it, the Cha-Ching Feature, as it is normally where Microsoft puts its entire set cool features (i.e. caching, navigation, etc.).

So now that we have experimented a little with the BLOB cache, let’s move on to the output cache. Once you active the appropriate feature(s), you will find your caching options under the Site Administration and Site Collection Administration option of your SharePoint’s setting page.

The output cache is responsible for storing the output of a page. It has the capability to store various versions of the same page based off of parameters. An example of this would be caching pages based off of local area like zip codes. Like the other caching options, output cache can really improve the overall performance of your SharePoint implementation by eliminating the most expensive part of the request: the content database. In a previous post, I outlined the HTTP request. If you examine the steps, you will notice that having output cache enabled cuts out the majority of the hard work help to ensure that the end user is getting what they need without any latency. All though output cache can really help in all areas, it is extremely powerful when it comes to publishing pages with anonymous access enabled. In the world of caching, you don’t want to server your content contributors cached pages, since you want them to be able to review the latest and greatest. When it comes to anonymous users, it’s an entirely different story. Output cache stores the pages in RAM, so after the page is requested the first time, it is ready to rock and roll. The short story is… cache for anonymous and not for publishers. Show how do you separate the two? Caching profiles help you do just that, and in SharePoint 2010, they have improved quite a bit.

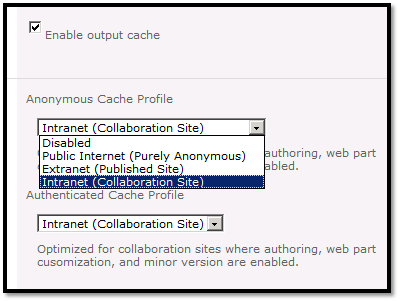
Once you click the ‘Output Cache Settings’ link, you will have the option to select the ‘Enable output cache’ checkbox. Under this you will notice the Default Page Output Cache Profile.

A cache profile specifies how long items should be held in the cache. It also describes to the caching system how to determine whether a cached page element is in fact valid for other requests for the same element from different users.

You can specify different cache profiles to use for anonymous and authenticated users. This optimizes the use of the cache based on the authentication methods allowed on the site.

Page output cache profiles specifically affect portal publishing pages.

So by default, you have four caching profiles to choose from: Disabled, Public Internet, Extranet, and Intranet.

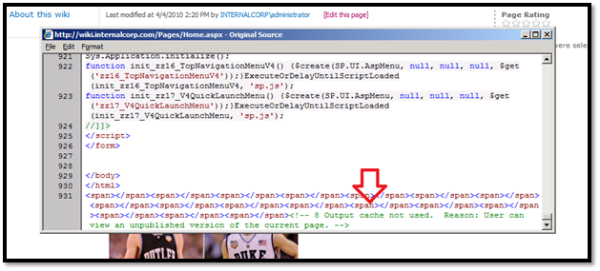
You also have the opportunity to specify a different caching policy for page layout designers and administrators and also specify whether or not you wish to collect Debug Cache Information. The debug cache information shows up in the source of your web page and will let you know which caching profile is currently enabled and when the information was saved.

Now we are going to take a look at a caching profile so that you can see how these guys work. We will focus on the Public Internet profile. Here you will see various properties that you can set. TechNet has an article on how to set many of the cache settings, but doesn’t go into caching profiles, so I will discuss these a bit.

Perform ACL Check – When this is set to ‘yes’, it will ensure that all of the items in the cache are properly trimmed for security by checking the access control list of the items. That sounds like something you might want to do all of the time, but remember this is an anonymous profile, and these visitor have limited to no rights.

Duration – This is how long the item will be cached for in seconds. The default setting is 180, so it’s 3 minutes.

Check for Changes – If this is set to ‘Yes’, SharePoint will check for changes in the page prior to rendering. So if you have this set, the duration doesn’t really add much value. If you want to keep your content for a specific amount of time, set this to ‘No’ and use the duration to its fullest potential.

Now we get to the Vary by parameters. These allow you to store multiple versions of the same page based off of specific values. You may have one cache setting for one HTTP Header versus another or based off of a Query String Parameter. Query Strings are represented in the URL by way of values after the ‘?’.

The Cacheability parameter specifies the devices that the object can be cached on. These are an enumerations are from HTTPCacheability (ASP.NET 2.0) and has six values, four that map directly to a Cache-Control HTTP header settings and two special values called HttpCacheability.ServerAndPrivate and HttpCacheability.ServerAndNoCache. ServerAndPrivate, the default setting here, allows a response to be cached only on the origin server and the requesting client. ServerAndNoCache means only the origin server.

Safe for Authenticated Use specifies whether or not an administrator can use this policy for authenticated users.

Allow writers to view cached content does exactly what it says. I don’t know of a good reason to use this one, but someone must have one, J

Ok, so that’s the run down on the caching profiles. Mix that with the output caching and you have a pretty powerful tool at your disposal.

Most of the caching options are only available to the Site Collection Administrator, but the Site Administrator does get the Site Output Cache option, which simply allows for overriding the Site Collection cache profile settings.

In my research for really trying to understand all of the caching mechanisms, I found a post called Measuring ASP.NET and SharePoint output cache. It’s short and sweet, so I will be applying these concepts to my virtual farm and make it the topic of my next post.

Content taken from :

http://shannonbray.wordpress.com/2010/04/04/digging-deeper-into-the-2010-caching-options-part-1/


Output Caching and Cache Profiles in SharePoint Server 2010

July 23, 2012

Microsoft SharePoint Server 2010 uses output caching technology native to ASP.NET to manage when and how page content is served. ASP.NET output caching is the foundation of the SharePoint Server 2010 caching functionality; consequently, output caching in SharePoint Server 2010 behaves similarly to output caching technology available in ASP.NET.

On a heavily accessed SharePoint Server 2010 site, caching frequently accessed pages for even a minute at a time can result in substantial throughput gains. While a page is cached by the output cache, subsequent requests for that page are served from the output page without executing the code that created it, for the specified duration of the cache.

Before choosing to use output caching to improve the performance of page rendering and page-item rendering, consider benefits and drawbacks of a potential output caching implementation. All considerations are not listed in this document, but some benefits you may want to consider include:

  • Each equivalent class of content (such as page or item within a page) receives faster response, and therefore shorter latency, after it is initially rendered.
  • Each server uses less CPU time and energy to serve the same page after the initial rendering.
  • Each data source for the rendered page can scale to serve more Web clients because of the decreased traffic flow that output caching makes possible.
  • For each page request for which an output cached version of a page is served, the server does not have to:
    • Make a round trip to the database to fetch the source code for the .aspx page and any .ascx controls on the page.
    • Reload and re-render the controls.
    • Requery any data sources that the controls rely on for data.

However, before deciding to implement output caching, you may want to consider the following concerns:

  • Output caching consumes additional memory. Each version of a page consumes memory on the Web client.
  • When used with two or more front-end Web servers, output caching may affect consistency. You can configure a cache profile not to check for updates for each request and, for example, instruct it to ignore changes to the version of the Web page in the output cache until 60 seconds after the original page is updated. If you have two front-end Web servers in your topology, depending on the load balancer used to route the user’s request, a reader of site content could see inconsistency if the page is rendered by one server and then a subsequent request is routed to a second server within that 60-second window.
SharePoint Server 2010 adds a more precise mechanism for customizing output caching than those available natively in ASP.NET 2.0. SharePoint Server 2010 includes cache profiles, which are list-style cache settings that you can name and apply to pages, page items, content types, and levels of scale in your site deployment.

By using cache profiles, you can control the level of granularity applied to output caching; allow or disallow site owners and administrators to choose their own cache profiles and apply them flexibly to page layouts; and target output caching at the site-collection level, the site level, and the page layout level.

You can organize caching behavior based on a user’s access rights to a site. For example, you may have three groups defined: one with full control, one with read and write rights, and one with read-only rights. Output caching renders the page the same way for users with the same rights, so you can use cache profiles to target caching to specific audience groups. In the cache profiles that SharePoint Server 2010 delivers by default, the caching system renders the page once per group of user access rights and then caches the resulting HTML stream. The next user with the same access rights gets the stream from the cache.

After you create and deploy a cache profile, any change to the cache profile immediately affects all applicable content on the site. For example, if all document library page layouts in a given site collection are initially cached for 60 seconds, and you increase that duration to 120 seconds, every document library page layout in that site collection is cached for 120 seconds, regardless of the number of document library page layouts or sites in the site collection.

You can define a cache profile by using the cache profile stored in a standard SharePoint Server 2010 list, and extend it programmatically by using a VaryByCustom handler. If you apply the cache profile to the site and page layout through the user interface, down-level propagation enforces consistency in child sites. Cache policy is secured independently from other SharePoint Server 2010 features.

To enable output caching for a site collection

  1. Navigate to the root Web site of the site collection. On the Site Actions menu, click Site Settings.
  2. In the Site Collection Administration section, select Site collection output cache.
  3. To enable output caching for this site collection, select Enable output cache.
  4. Choose a cache profile for anonymous users from the Anonymous Cache Profile list. This profile is applied when anonymous users access a site in this site collection.
  5. Choose a cache profile for authenticated users from the Authenticated Cache Profile list. This profile is applied when authenticated users access a site in this site collection.
  6. Choose Page Output Cache Policy options:
    • If publishing sites can use a different output cache profile, select Publishing sites can use a different page output cache profile.
    • If page layouts can use a different output cache profile, select Page layouts can use a different page output cache profile.
  7. If you want to display additional cache information on pages in this site collection, including the date and time that page contents were last rendered, select Enable debug cache information on pages.
  8. Click OK.

To enable output caching for a site

  1. Navigate to the root Web site of the site collection. On the Site Actions menu, click Site Settings.
  2. In the Site Administration section, select Site output cache.
  3. Choose an Anonymous Cache Profile option:
    • If you want to inherit a cache profile, click Inherit.
    • If you want to choose a cache profile from those currently available, select Select a page output cache profile.
  4. If you want to apply these settings to all subsites of this root Web site, select Apply these settings to all sub-sites.
  5. Click OK.

To create a new cache profile

  1. Navigate to the root Web site of the site collection. On the Site Actions menu, click Site Settings.
  2. In the Site Collection Administration section, select Site collection cache profiles.
  3. Click New.
  4. Define and create a new cache profile.
    Table 1. Cache profile detail descriptions
    Detail Description
    Title Required. The system name of this cache profile.
    Display Name Populates the list of available cache profiles for site owners and page layout owners.
    Display Description Populates the list of available cache profiles for site owners and page layout owners.
    Perform ACL Check Select to ensure that all items in the cache are security trimmed.
    Enabled Select if you want caching to happen.
    Duration Number of seconds to keep the cached version available.
    Check for Changes Select to validate on each page request that the site has not changed and to flush the cache when the site changes.

    Clear if you want better performance. If unchecked, system does not check for updates to sites for the number of seconds specified in Duration.

    Vary by Custom Parameter Specify a value as described in the ASP.NET HttpCachePolicy.SetVaryByCustom method documentation.
    Vary by HTTP Header Specify a value as described in the ASP.NET HttpCachePolicy.VaryByHeaders property documentation.
    Vary by Query String Parameters Specify a value as described in the ASP.NET HttpCachePolicy.VaryByParams property documentation.
    Vary by User Rights Select to ensure that users must have identical effective rights on all SharePoint security scopes to see the same cached page as any other user.
    Cacheability Choose a value from the drop-down list. Choices include NoCache, Private, Server, ServerAndNoCache, Public, and ServerAndPrivate. To learn more, see the ASP.NET HttpCacheability enumeration topic.
    Safe for Authenticated Use Select only for policies that you want to allow administrators and page layout designers to apply to authenticated scenarios.
    Allow Writers to View Cached Content Select to bypass the default behavior of not allowing people with edit rights to cached their pages.


SharePoint 2010: Excel Services – Part 2

July 23, 2012

In the previous Blog entry, we focused on the introduction to how Excel Services is managed in SharePoint 2010. In this post we’ll look at the a new concept in SharePoint 2010 – Managed Services. These are grouped under Service Applications, which is a farm-level resource that is shared across sites in the farm. It provides an endpoint to one or more services that run on an application server. In Excel Services for SharePoint 2010 installation, the Excel Services Service also requires a service application. The service application provides a run time context for querying and managing Excel Services data in the farm.

Is this post we’ll look at how an Excel Services Service is created and configured. In Later post we’ll look at other details of this Service Application.

  1. How an Excel Services service application is created and configured

    Excel Services for a SharePoint 2010 installation must have at least one Excel Services service application in the farm. A service application is created automatically if you used the New Standalone Server installation option. Otherwise, if you used the Existing Farm installation option, you must create an Excel Services service application as a post-installation task.

    Creating a service application makes the service available and generates the service application database. Depending on options you select when creating the service application, a Excel Services service connection is added to the default service connection group. All SharePoint Web applications that subscribe to the default service connection group will get immediate access to the Excel Services service application automatically.

    You can create multiple Excel Services service applications. Although one service application is sufficient for most deployment scenarios.

    Creating additional service application introduces new requirements for managing service associations. Namely, it will require that you create and use custom service association lists for each additional service application that you create.

    If you do not have a specific reason for creating additional Excel Services service application, you should use a single service application for all of the Web applications in the farm.

To Create a NEW service application, follow the following steps:

  1. In Central Administration, in Application Management, click Manage Service Applications.
  2. In the Service Applications ribbon, click New.
  3. Select Excel Services Service. If it does not appear in the list, Excel Services for SharePoint 2010 is not installed or was not installed correctly.

  4. In the Create New Excel Services Service Application page, enter a name for the application. If you are creating multiple Excel Services service applications, a descriptive name will help other administrators understand how the application is used.
  5. In Application Pool, create a new application pool for the application (recommended). Select or create a managed account for the application pool. Be sure to specify a domain user account. A domain user account is required if you plan to scale out the deployment to include additional service instances that will run under the same identity.
  6. Optionally, select the checkbox for Add the proxy for this Service Application to the farm’s default proxy group. This adds the service application connection to the default service connection group.


    You must select this checkbox if you are creating your first Excel service application.
    Do not add the Excel service application to the default connection group if one already exists. Adding multiple entries of the same service application type is not a supported configuration and might cause errors

  7. Click OK. The service will appear alongside other managed services in the farm’s service application list.

Configuring the NEW service application, follow the following steps:

A Excel Services service application is created using a default configuration. The default settings are recommended for most scenarios. Change them only if you encounter slow response time or dropped connections, or if you are varying Excel Services service configuration for specific SharePoint Web applications.

  1. In Application Management, click Manage Service Applications. In the list of service applications, you should see the service application you just created and named.
  2. Click the Excel Services service application. This opens the Excel Services “Control Panel”.

  3. The “Global Settings” is where you set most of the the configuration options. (See Part 1 of these Posts)
  4. In Unattended Account under Global Settings, you can specify a Secure Store Services target application that stores a predefined account for running Excel Services jobs. This account is created automatically if you used the New Standalone Server option in SQL Server Setup to install Excel Services for SharePoint. Otherwise, you must create this account manually.

SharePoint 2010: Excel Services – Part 1

July 23, 2012

What’s New

Excel Services 2010 has made some major improvements. Here are some of the key ones (compliments of TechNet)

Several of these new features originate in SharePoint Server but directly affect all of the shared services. New shared features and the exclusive features that are added when you deploy Excel Services are discussed in this section.

  • Unattended Service Account
    Excel Services provides a low privilege unattended service account for customers to use as a single “get data” type of account. Customers can use this as a privileged account in Microsoft Office 2010. Excel Services relies on the Secure Store Service to store the encrypted unattended account. The unattended account credentials are stored or cached as needed per session or connection so that when a workbook is loaded that contains a data connection for the unattended account this account is called from the Secure Store and used. The Secure Store stores the Excel Services secured data and is present on all SharePoint Server farms. The Secure Store functions regardless of how authentication is configured in a farm.
  • Manage Service Applications
    The SharePoint Central Administration Web site contains a link to the Manage Service Applications page, which lists all of the services the user has rights to administer. Essentially, all available services for a particular user or role are collected on the Manage Service Applications page. Each service has its own administration page, for instance Manage Excel Services.
  • Windows PowerShell
    Windows PowerShell is capable of a complete Excel Services deployment, as well as the unattended installation and deployment of SharePoint Server Technical Preview. Administrators who need to look up Trusted Locations and user-defined functions are now able to do this by using a single Windows PowerShell key. All Stsadm commands used against Excel Services–specific settings will fail; instead use the SPServiceApplication Windows PowerShell command.
  • Trusted Locations
    Trusted locations are now provided by default; no administrator action typically is needed. However, if Universal Naming Convention (UNC) types of trusted folders or locations are used with Excel Services, the administrator must create new trusted locations for these.
  • Multi-user Collaboration
    Multi-user collaborative environment provides multiple users with the ability to edit any workbook simultaneously. (When user is active, the polling rate is determined by an adaptive algorithm executed on the ECS. All edits are processed in the order in which they are received by the ECS so the last edit overwrites any previous edit to the same workbook cell.)
  • Delegate Services Permissions
    SharePoint Server contains a new shared service infrastructure that allows the central administrator to delegate permissions to manage other services to users.
  • Slicer feature
    The Slicer feature is a new type of data filter in Microsoft Excel 2010 that is interactive, flexible in design and layout, and always conveys the current filtering state. With these data filters more people benefit from the power of analyzing data using PivotTables and OLAP Functions. The Slicer feature gives Excel 2010 authors the ability to easily write OLAP data models and build rich, interactive reports around them. The reports can then be published to Excel Services and will display and interact just like they do in the Excel client. The Slicer feature also is parameterized by other Web Parts in BI dashboards. The Slicer feature does manual filtering only and does not provide advanced filtering such as label, date, value, and top-10 types of filtering. The Slicer feature can be connected to multiple PivotTables and act as a common, shared filter so selections made in this Slicer feature are automatically propagated to all PivotTables that are connected to it. Additionally, the Slicer feature can be formatted by applying styles.
How do we set it up?
So during this section, I’m not going over the “finer” how to install, but rather on how a SharePoint 2010 administrator can configure and setup items such as unattended user service.

All Management of Excel Services is done through the Microsoft SharePoint 2010 Central Administration and requires local administrative permissions. The system administrator can delegate Excel Services administrator permissions without providing permissions to manage other services or settings in Central Administration.

  • Open the Excel Services Settings page. To open the Excel Services Settings page, do the following:

    • On the SharePoint 2010 Central Administration Home page, click Manage service applications.
    • On the Manage service applications page, click Excel Services.

    • On the Manage Excel Services page, click Global Settings.
  • On the Excel Services Settings page, in the Security section, under File Access Method, select one of the following:
  • In the Load Balancing section, under Load Balancing Scheme, select one of the following:

  • In the Session Management section, in the Maximum Sessions Per User box, type the maximum number of sessions with Excel Services that an individual user is allowed per ECS application server (type -1for no limit). The default is 25 sessions. If the maximum number of sessions is reached, then the oldest session is deleted whenever a new session is started.
  • In the Memory Utilization section, in the Maximum Private Bytes box, type a value in megabytes (MB) for the maximum number of MB that an ECS process can use (type -1 for the value to equal 50% of physical memory on the computer hosting the ECS process).
    • In the Memory Cache Threshold box, type a value from 0 to 95 that represents the percentage of the Maximum Private Bytes that can be allocated to inactive objects. When the memory cache threshold is exceeded, any cached objects that are not currently in use are released.
    • In the Maximum Unused Object Age box, type the maximum time (in minutes) that inactive objects remain in the memory cache.

    In the Workbook Cache section, in the Workbook Cache Location box, type a path for the workbook file cache on the computer hosting the ECS server. If the box is left empty, a subdirectory in the system temporary directory will be used.

    • In the Maximum Size of Workbook Cache box, type a value in MB that can be allocated to workbooks that are being used by Excel Services. Recently used files that are not currently open count against this value.
    • To cache objects that are not being used in any sessions, select the Caching Enabled check box.

  • In the External Data section, in the Connection Lifetime box, type a value in seconds for the maximum time for a connection to remain open. Connections that expire are reopened when the next query is received (type -1 to never close and reopen connections).

    You can reduce the risk of a denial-of-service attack by limiting the amount of time that sessions remain open.
  • In the External Data section, under the Unattended Service Account section, provide the target application ID from Secure Store Service in the Application ID box.

    That covers the introduction to the key settings of Excel Services 2010 (compliments in-part to TechNet). What I’ll do in the next couple of editions is discuss these settings and how to get them working and for what reasons. Take for instance in Part 2 of this section we’ll cover on how to setup the Application ID that can be used with the “Unattended Service Account” option.

AJAX and ASP.NET

July 20, 2012

AJAX and ASP.NET

   Interaction with a Web application can be initiated via a synchronous or asynchronous request from the client to the server.  The traditional ASP.NET Web page model uses a synchronous request to initially load a page and its content.  Subsequent interaction with the page uses synchronous full page postbacks, which are usually triggered on the client by submitting an html form.  A postback merely involves posting data back to the existing page on the server in the same session.  During a full-page postback, the Web page and controls are recreated and a new version of the entire Web page is rendered on the client.  In addition, most of the application logic is present on the server-side.   Unfortunately full page postbacks often introduce a great deal of processing overhead which can decrease performance.  Since the entire page must be reconstructed via a synchronous request to the server, the client must wait for a response to continue working.  On the other hand, asynchronous requests can improve performance and enhance the end user experience when working with a Web application.   Asynchronous requests utilize a set of technology standards commonly referred to as AJAX (Asynchronous JavaScript and XML). AJAX includes:

  • Presentation content using XHTML and CSS
  • Dynamic display and interaction with XHTML (DHTML) using the Document Object Model (DOM)
  • Data interchange using strings, often in XML format 
  • Asynchronous data retrieval using an http request object (XMLHttpRequest object) 
  • JavaScript – to bind everything together 

Asynchronous requests are initiated by using JavaScript in the browser client to create a new connection to a server.  This includes stateful postbacks to a page or stateless requests to services apart from the current page.  In the case of an asynchronous postback, only the information that needs to be processed by the current page on the server is passed in the request.  Since the contents of the entire page do not need to be submitted, the page lifecycle for a asynchronous postback only calls server events associated with processing and rendering the requested content.   In either case, asynchronous requests are handled by creating explicit connections to a server, which means an end user can continue working in the client application while the request is being processed.  When a response is returned, the appropriate content in the Web page (browser memory) is updated without refreshing the entire page.  The diagrams below illustrate the difference between synchronous and asynchronous communication between a client application and a server.

Synchronous                                                                  


Asynchronous


AJAX solutions are generally divided into three framework categories: callback, UI and full.  A callback framework consists of a simple set of client and server libraries.   It generally involves invoking methods on a server component and moving input and output parameters in a serialized format.  A UI framework consists of a set of server controls that manage asynchronous postbacks and inject client JavaScript in a page at runtime.  A full framework provides a comprehensive programming model which includes controls, services and public APIs on both the client and the server.  

Microsoft provides two solutions for managing asynchronous postbacks in an ASP.NET 2.0 Web application: a callback framework solution using ASP.NET client callbacks and a full framework solution using ASP.NET AJAX.  

ASP.NET client callbacks

With the release of ASP.NET 2.0, Microsoft introduced client callbacks for simple, lightweight, yet effective AJAX solutions in a Web application.  One interface (ICallbackEventHandler), a client script manager class and a single JavaScript file (WebForms.js) are provided to manage asynchronous communication between client and server.  At runtime, after initial page load, a callback to a page runs a modified version of its normal life cycle (see diagram below) where the page is initiated and loaded, but the page contents are not rendered.   Instead, a single method in the server-side code is invoked, which processes the callback request and returns a value to the browser and can be read by a JavaScript function.  The JavaScript function uses technology inherent to the browser (e.g. DOM, DHTML) to update Web page content dynamically.    While the communication process is extremely lightweight, callbacks do have one significant drawback.   When utilizing a callback solution, Web developers are responsible for providing all the server and client-side code necessary to rerender controls in a browser and manage client-server synchronization.     

ASP.NET AJAX

To provide a more comprehensive AJAX solution Microsoft released ASP.NET AJAX in early 2007.  ASP.NET AJAX provides a complete client-server architecture for developing and deploying AJAX solutions.  The server components include a set of controls and an API to manage the display of and interaction between Web controls and services.   The client component consists of a set of JavaScript libraries (termed the “Microsoft AJAX Library”) which manage asynchronous communication with Web applications and services and update browser content dynamically.   Together they operate to synchronize client\server interaction in an asynchronous communication environment without requiring a Web developer to write custom client script to manage events and rendering.       

At a basic level, Microsoft AJAX supports asynchronous requests via a partial page postback.   Partial postbacks iterate through the same page lifecycle as a synchronous full page postback, but only specific regions or controls on the page are refreshed – thus partial page rendering.   ASP.NET AJAX is dependent on the interceptor pattern to generate and handle a partial post back.  Upon initialization, ASP.NET AJAX JavaScript libraries add a set of client event handlers to intercept calls that would normally initiate a full page postback.  The handler functions intercept postback calls from registered controls, generate a partial postback, process response content and update page content asynchronously.   Since ASP.NET AJAX is built on the existing ASP.NET postback architecture it also supports utilizing event validation and maintaining view state in a partial postback communication process.  

While ASP.NET AJAX does provide an extensive architecture, three components are integral to its use: the ScriptManager and UpdatePanel server controls and the PageRequestManager object on the client. 

In general, the ScriptManager enables the use of ASP.NET AJAX within a page.  It provides the Microsoft AJAX Library (MicrosoftAjax.js and MicrosoftAjaxWebForms.js) to the client browser which includes the complex client framework for intercepting postback requests to generate partial postbacks and processing partial postback responses to update page data.   Only one ScriptManager is required per page and it must be the first control in the page.  It is designed to work in conjunction with the PageRequestManager JavaScript object to register controls to initiate partial postbacks or update content, register event handlers, initialize the interceptor pattern, etc.  Only server controls that implement IPostBackEventHandler, IPostBackDataHandler and INamingContainer can initiate a partial postback when registered with the ScriptManager.  During a postback you may want to update (rerender) specific controls and content in the page.  This can be easily achieved using the UpdatePanel control which enables specific portions of a page to be updated during an asynchronous postback.  It can contain any valid page content, such as HTML and server controls.  By default, when a server control in an UpdatePanel initiates a postback, it will generate an asynchronous postback and update the content of the UpdatePanel.  In addition, other server controls in the page (known as triggers) can cause UpdatePanel contents to rerender during an asynchronous postback.  The ScriptManager keeps track of the UpdatePanels on the page and their respective triggers.   When a partial postback is processed on the server, the page and all controls in the page will iterate through their full lifecycle, which includes rendering events.  The ScriptManager will determine which controls to rerender based on the control which initiated the partial postback (a parameter of the request).    In general, any UpdatePanels associated with this control as a trigger and any UpdatePanels with an UpdateMode property set to Always will be rerendered and included in the partial postback response.   Note that every control in the UpdatePanel will be rerendered, even if its state did not change.  

It is important to note that utilizing the partial postback capabilities of ASP.NET AJAX does not require the use of an UpdatePanel – the UpdatePanel merely makes it easier to define sections within a page that may be updated asynchronously via a partial postback.   The ScriptManager provides more fine grained control over partial postback response content by enabling the registration of data items and client script blocks.  However, in both cases some custom JavaScript is required to manage interaction with the data on the client.      

The table below highlights a few differences between ASP.NET client callbacks and ASP.NET AJAX partial postbacks:

Topic ASP.NET client callbacks ASP.NET AJAX partial postbacks
Availability  Included with ASP.NET 2.0. Visual Studio 2005, .NET 2.0: Requires the download and installation of AJAX Extensions.Visual Studio 2008, .NET 3.5: Includes AJAX Extensions 
Required modifications to a basic ASP.NET Web application  None. Add a reference to System.Web.Extensions and add custom handlers and services to the Web.config. 
Includes server controls?  No.  Yes. A set of controls to manage client/server registration,  synchronization, and rendering.  
Includes client script? Yes. One file, WebForms.js, included as a WebResource.  The JavaScript functions are merely designed to send and receive a serialized message.  Custom JavaScript code must be created to parse a callback response and update page content.  Cross-browser support must be explicitly created.   Yes. Two files, MicrosoftAjax.js and MicrosoftAjaxWebForms.js, included as ScriptResources.  Both provide cross-browser support for a rich public client API to support working with server components in a script environment.  Includes event handlers, view state maintenance, event validation, and most importantly the logic to update page content asynchronously.  No custom JavaScript code is explicitly required.  Note, the WebForms.js file is also included to support client callbacks within the context of an ASP.NET AJAX Web application.       
Enable on a server control To process a callback, a control must implement ICallbackEventHandler.  To trigger and process a postback (partial or full), a control must implement IPostBackEventHandler, IPostBackDataHandler or INamingContainer. 
Initiate a request Add ClientScript reference to a page and call JavaScript WebForm_DoCallback at runtime. Add a ScriptManager control to a page, then add and register a control with the ScriptManager to generate an asynchronous postback.  Initiate a postback from the control at runtime.
Which control initiated the request? In the callback request, the value of the parameter __CALLBACKID equals the id of the server control associated with the callback (defined in the WebForm_DoCallback function). Example syntax:
__CALLBACKID=Page1
In the postback request, the ScriptManager id operates as the parameter.  In general, the value is the id of the control that initiated the partial postback.  It is in the format <id of the control registered to>|<id of the registered control>.  Controls can register with the ScriptManager directly or via an UpdatePanel.   The ScriptManager.AsyncPostBackSourceElementID property will return the id of the control that initiated the partial postback. Example syntax:
ScriptManager1=UpdatePanel1|Button1
Generate the response on the server  The control associated with the callback request will generate a custom serialized callback response string.  The control which initiated the postback will dictate which controls will be updated in the postback response.  The rendering methods (e.g. PreRender, Render) generate the control content and a string serialized for ASP.NET AJAX JavaScript libraries is included in the postback response. 
Process the response on the client Since a serialized string in a custom format will be returned to the client, custom JavaScript must be created to explicitly process the string and update the browser client.  The ASP.NET client callback framework does not include any prepackaged JavaScript to process the callback response string. In many cases, ASP.NET AJAX JavaScript will update the browser client without custom code.  Custom controls will often require custom JavaScript. 
Maintains view state and manages event validation? No. Yes.

The diagram below illustrates the difference between the page lifecycle sequence of events between a page postback (synchronous full page postback and asynchronous partial postback) and a client callback.  The Page.IsPostback property will return true for all three request types.  The Page.IsCallback property will return true only when the request is a client callback.  To distinguish between a full and partial postback, the ScriptManager control maintains an IsInAsyncPostBack property.   The property will return true only when the request is a partial postback.  Note that a page can contain only one ScriptManager.  To return the ScriptManager for a given page, use the static ScriptManager.GetCurrent() method and pass the Page object as a parameter.


Working with AJAX in an ASP.NET Web application

Two walkthroughs are presented below to illustrate the differences between the implementing an ASP.NET AJAX and ASP.NET client callback solution.   A simple example is provide for instructive purposes.  The example involves clicking on a button to trigger an asynchronous request and returning the current time on the Web server to be rendered in the browser client.   A set of steps detailing the implementation and runtime process is provided.  Note that at a basic level, the client callback solution requires more client and server code to implement, but the request/response payload is completely customizable and the page/control lifecycle is shorter when compared to the ASP.NET AJAX solution.    Also, client callbacks can be initiated using pure HTML client elements and server controls.   ASP.NET AJAX partial postbacks are designed to be initiated by server controls.  

Walkthrough: Working with partial postbacks in an ASP.NET Web application

The source code for this walkthrough is included in the SimpleParitalPostback.aspx page in the sample: Common_PartialPostback.

Leveraging ASP.NET AJAX in a ASP.NET 2.0 Web application involves working with a set of AJAX controls and the standard postback model to handle events and manage view state.   The process may involve three steps.  First, install ASP.NET AJAX and create a Web application with the appropriate references.  Second, add and configure AJAX and server controls in the page.  And finally, handle events on controls in the page to update portions of a page asynchronously.  

The following outline highlights the basic steps used to utilize ASP.NET AJAX functionality in a Web page.

  1. Install ASP.NET AJAX.If ASP.NET AJAX has already been installed, skip this step.  To install, download and install the ASP.NET 2.0 AJAX Extensions 1.0 msi from http://asp.net/ajax/downloads/.   The setup includes a set of .NET assemblies containing server controls and APIs, a set of JavaScript libraries (the Microsoft AJAX Library), and a web.config. 
  2. Create an ASP.NET Web application that includes ASP.NET AJAX entries in the Web.config file. These entries include references to the System.Web.Extensions and a set of handlers and services.  Visual Studio 2005 provides a template “ASP.NET AJAX-Enabled Web site” which includes these references.  The ASP.NET AJAX setup includes a web.config which can be used to replace the basic web.config generated for a standard ASP.NET Web application.   
  3. Add a ScriptManager control. In the Visual Studio toolbar under the AJAX Extensions tab, drag a ScriptManager control onto the page.  The ScriptManager must be placed in a form tag with runat=server.   It must also be listed before any other controls in the form that require it. Adding a ScriptManager to a page enables the use of ASP.NET AJAX JavaScript libraries at runtime.  When a ScriptManager is present in a page at runtime, at a minimum, three sections will also be included in the page to initialize ASP.NET AJAX JavaScript: references to AJAX JavaScript,  initialization of PageRequestManager, and initialization of the ASP.NET AJAX application components. 
    • ASP.NET AJAX includes an HTTP handler (ScriptResourceHandler) to streamline the distribution of scripts to clients by enabling the ability to compress script content.   Modifications to the web.config (mentioned earlier in this document) to support ASP.NET AJAX expose the handler for use via the root path ScriptResource.axd.  When a ScriptManager is present in a page at runtime, a set of script tags similar to the following will be included:
      <script src="/MyWebsite/ScriptResource.axd?d=-EaodRrAjwRcPF2Gnc0YTNE1ohGg-MHKgQ4-4pRODSHBpzTL_f7ixjpCSIhHG2x_q1Kg2a4Q7LhPzEHqJQOaEpGifN0than184BduvwGeY81&
      t=633251404579172099" type="text/javascript"></script>
      <script src="/MyWebsite/ScriptResource.axd?d=-EaodRrAjwRcPF2Gnc0YTNE1ohGg-MHKgQ4-4pRODSHBpzTL_f7ixjpCSIhHG2x_q1Kg2a4Q7LhPzEHqJQOaEoPWXTHIX55Yb3IV2xe_j-4sb
      m1dKOIjJjgq4yMc1L5C0&t=633251404579172099" type="text/javascript"></script>

      Note that the standard ASP.NET WebResource handler is used to include a reference to the script callback library WebForms.js.  It is included with the ScriptManager for convenience.

    • The PageRequestManager works in conjunction with the ScriptManager to register which controls will trigger asynchronous postbacks and which UpdatePanels will update.  PageRequestManager also handles the initialization of the interceptor pattern required for ASP.NET AJAX to handle postbacks asynchronously.  To accomplish this, the following JavaScript calls are included in the page:
      Sys.WebForms.PageRequestManager._initialize('ScriptManager2', document.getElementById('form1'));
      Sys.WebForms.PageRequestManager.getInstance()._updateControls(['tUpdatePanel1','tUpdatePanel2','tUpdatePanel3'], ['Button1','Button2'], [], 90);
    • ASP.NET AJAX JavaScript components and handlers need to be initialized after the content of the form loads.  To accomplish this, the following JavaScript is included in the page at the bottom of the form in which the ScriptManager resides: 
      Sys.Application.initialize();

    Listed below are a few key members of interest on the ScriptManager control:

    ScriptManager members Description
    Properties  EnablePartialRendering Enables partial rendering of a page, which in turn enables you to update regions of the page individually by using UpdatePanel controls.  By default, this property value is true.
    Methods  RegisterAsyncPostBackControl Registers a server control for asynchronous postbacks, which can be used to update specific regions of the page.  This method is used for controls outside of an UpdatePanel control, which would by default perform a synchronous full page postback.  The control must implement IPostBackEventHandler, IPostBackDataHandler, or INamingContainer.  
     RegisterPostBackControl Registers a server control for synchronous full page postback.  This method is used for controls inside an UpdatePanel control that would otherwise perform asynchronous postbacks.  The control must implement IPostBackEventHandler. 
  4. Add an UpdatePanel control. In the Visual Studio toolbar under the Extensions tab, drag an UpdatePanel control onto the page.  Add the UpdatePanel after the ScriptManager control.  Listed below are a few key members of interest on the UpdatePanel control:
    UpdatePanel members Description
    Properties ChildrenAsTriggers Indicates whether postbacks from immediate child controls of an UpdatePanel control update the panel’s content.  The default is true.
    Triggers A collection of controls and their events that cause the UpdatePanel control to update upon postback.
    UpdateMode Two options: Always and Conditional.  Always is the default and will cause the UpdatePanel to update upon every postback.  Conditional will only cause the UpdatePanel to update when a trigger (registered or child control) initiates a postback.  
  5. Add a Button and Label (both server controls) in the UpdatePanel.Since the Button implements IPostBackEventHandler and is within the UpdatePanel, it will initiate an asynchronous postback upon click.  Set the Text property on the Button to “Get Server Time”.
    The page should appear as follows:    
  6. Handle the click event of the Button and change the Label text.Handle the client event of the Button as you would for a traditional postback.  For example, add the in the declarative content of the page, add OnClick attribute and reference a method in the page, Button1_Click.  
    <asp:Button id=Button1 onclick=Button1_Click Text="Get Server Time" runat="server"></asp:Button>

    In the event, set the Label1 Text property to the current time on the server. 

    [C#]
    protected void Button1_Click(object sender, EventArgs e)
    {
      Label1.Text = DateTime.Now.ToString();
    }

    The following diagram illustrates an asynchronous postback event to initiate partial rendering of a page at runtime.  The green circles indicate the order in which events occur to initiate and process the postback.  A description for each step is provided below.

    1. By default a server control Button is rendered as an HTML input element that submits the form it resides in.  When a ScriptManager is present within a page, all calls to form.submit() or __doPostBack are intercepted by a handler added during Sys.WebForms.PageRequestManager initialization (initial page load).  At runtime these calls, whether synchronous or asynchronous, are redirected to the private function PageRequestManager._onFormSubmit().   In this case, clicking the Button will submit the form and trigger an asynchronous postback since the Button resides in an UpdatePanel.  Controls outside an UpdatePanel need to register with the ScriptManager to initiate an asynchronous postback.  A new AJAX object Sys.Web.WebRequest is created, properties are set and it is invoked.    
    2. When the WebRequest is invoked is uses a Sys.Net.XmlHTTPExecutor to create an XMLHttpRequest object.  The XMLHttpRequest object connects to the server and submits the request.  The request includes a reference to the ScriptManager and the control that initiated the postback, a custom header (“x-microsoftajax”), view state and event validation information.   Here is an example request, note some of the general header information has been excluded:
      POST /MyWebsite/SimplePartialPostback.aspx HTTP/1.1
      x-microsoftajax: Delta=true
      Content-Type: application/x-www-form-urlencoded
      
      ScriptManager1=UpdatePanel1|Button1&__EVENTTARGET= &__EVENTARGUMENT=&
      __VIEWSTATE= %2FwEPDwULLTIxMTM4NzY5MzFkZKNQGsH4q9tpA8BH6b84TcMfi0fV&
      __EVENTVALIDATION=%2FwEWAgK4%2FtfdBQKM54rGBpRqW1kQZkPGexH7%2B3rIj%2BivSiMJ&
      Button1=Get%20Server%20Time
    3. On the server, the ScriptManager control manages all page and control rendering via interaction with the ASP.NET AJAX System.Web.UI.PageRequestManager and System.Web.UI.ScriptManager.IPage interface.   The PageRequestManager determine if the postback is asynchronous and initiated by client using ASP.NET AJAX JavaScript.  It looks for the header “x-microsoftajax” to contain the argument\value pair “Delta=true”   If true, the ScriptManager will intercept all page content rendering and generate the HTTP response.  If an UpdatePanel is to be rerendered during the postback, all controls it contains are completely rerendered, even if they did not change.   The first part of the partial postback response contains the raw rerendered content.  The next section includes a set of serialized values to track view state, event validation, asynchronous postback controls, UpdatePanels and triggers.  The final section is optional and includes any custom data items or script includes registered with the ScriptManager during postback processing on the server.  Here is an example response, note some of the general header information has been excluded:
      HTTP/1.1 200 OK
      Server: Microsoft-IIS/5.1 Date: Thu, 08 Nov 2007 01:07:21 GMT
      Content-Type: text/plain; charset=utf-8
      
      172|updatePanel|UpdatePanel1|
      <input type="submit" name="Button1" value="Get Server Time" id="Button1" />
      <span id= "Label1">11/7/2007 5:07:21 PM</span>
      |1e0128|hiddenField|__VIEWSTATE|/ wEPDwULLTIxMTM4NzY5MzEPZBYCAgMPZBYCAgMPZBYCZg9kFgICAw8PFgIeBFRleHQFFDExLzcvMjAwNyA1OjA3OjIxIFBNZGRkYeVef8HDv2pb/77ZnVtAjeVPeVI=
      |48|hiddenField|__EVENTVALIDATION|/wEWAgK18bqfBQKM54rGBoFX9wkAeMuxT4L2336BrKkHwERo|0|asyncPostBackControlIDs|||0|
      postBackControlIDs|||13|updatePanelIDs||tUpdatePanel1|0|childUpdatePanelIDs|||12|panelsToRefreshIDs||UpdatePanel1|2|asyncPostBackTimeout||90|
      26|formAction||SimplePartialPostback.aspx|13|pageTitle||Untitled
      Page|0
    4. The partial postback response is returned to the browser client and processed by the WebRequest which wrapped the initial request.  The body of the response is directed to the PageRequestManager._onFormSubmitCompleted() function by a handler registered with via WebRequest.add_completed function.  The _onFormSubmitCompleted() function contains the logic to parse the body of the response.  The logic is designed to update page elements and view state, execute JavaScript includes, pass data items to their respective handlers, and modify ASP.NET AJAX JavaScript components dynamically. 
            

Walkthrough: Working with client callbacks in an ASP.NET Web application 

The source code for this walkthrough is included in the SimpleCallback.aspx page in the sample: Common_Callback

Developing an ASP.NET 2.0 Web application that uses client callbacks is a two-step process.  First, create the server-side code that will be invoked by the client.  Second, create the client-side code to invoke the callback request and process the response.  Note that the message in the callback request and response is always a string.  The content and format of the string is up to the developer.  The request usually includes a string to tell the server which action to perform and some user provided data.  The response usually contains content to be rendered on the client or a set of data to trigger further actions.

The following outline highlights the basic steps used to implement client callbacks in an ASP.NET 2.0 Web page.  It assumes that you have created a standard, empty ASP.NET Web application.  

  1. Implement the System.Web.UI.ICallbackEventHandler.The ICallbackEventHandler interface can be implemented on a page or a Web control.   The interface contains two key methods: RaiseCallbackEvent(string EventArgs) and GetCallbackResult().  RaiseCallbackEvent() receives the message in the callback request sent from the client.  It can be designed to parse the message and determine what server-side logic will be executed.  Once the server-side code is finished, it creates a string of values to be sent to the client using the GetCallbackResult() method.   Here is an implementation example of both methods in the code-behind page Default.aspx.cs.  The eventArgument will be updated via a callback request from the client.  This is discussed in greater detail below. 

    [C#]

    public partial class Default : System.Web.UI.Page, System.Web.UI.ICallbackEventHandler
    {
    
    	string returnstring;
    
    	string ICallbackEventHandler.GetCallbackResult()
    	{
    		return returnstring;
    	}
    
    	void ICallbackEventHandler.RaiseCallbackEvent(string eventArgument)
    	{
    		if (eventArgument == "getservertime")
    		{
    			returnstring = DateTime.Now.ToString();
    		}
    	}
    	}
  2. Call the GetCallbackEventReference method on the Page class.The GetCallbackEventReference method creates a JavaScript string in the client Web page to start the callback.  The usage and method parameters are listed below:
    Usage: GetCallbackEventReference(control, argument, clientCallback, context, clientErrorCallback, useAsync);
    Parameter Name Description
    control The control or the page which implements ICallbackEventHandler.
    argument Name of a client-side JavaScript variable. References the string sent to the RaiseCallbackEvent method via the eventArgument parameter.
    clientCallback Name of the client-side JavaScript function which will receive the result of a successful server event.
    context Name of a client-side JavaScript variable. Usually used to determine the content of the message (argument) in the callback request. The value of the variable will be stored on the client as the context parameter associated with a callback.
    clientErrorCallback Name of the client-side JavaScript function which will receive the callback result when an error occurs.
    useAsync Boolean to determine whether a synchronous or asynchronous callback is made to the server.

    Here is an example of the method used in code.  The sCallBackFunctionInvocation member variable is a public string, global to the Page class:

    [C#]

    public string sCallBackFunctionInvocation;
    
    protected void Page_Load(object sender, EventArgs e)
    {
        sCallBackFunctionInvocation = Page.ClientScript.GetCallbackEventReference(this,
          "message", "processMyResult", "context", "postMyError", true);
    }

    At runtime, when the Web page is first loaded, the GetCallbackEventReference method generates a JavaScript string that contains the WebForm_DoCallback function with the parameters listed above.  The next step will discuss adding a reference to this function in client-side code. 

  3. Create the client-side code to trigger the callback and process the response.Implementing System.Web.UI.ICallbackEventHandler and calling GetCallbackEventReference will add a line similar to the following script tag in your aspx page at runtime:
    <script src="/MyWebsite/WebResource.axd?d=TqQApA1CcEIyShhLjzTczw2&t=632657807109074470" type="text/javascript">
    </script>

    WebResource.axd is a HTTP Handler included with ASP.NET 2.0 that enables Web page and Web control developers to download resources that are embedded in an assembly.   The System.Web.dll contains a JavaScript resource that contains the WebForm_DoCallback function.  The format of this URL is WebResource.axd?d=encrypted identifier&t=time stamp value .  The “d” refers to the requested Web resource and is an encrypted string of the assembly name and resource name.  The “t” is the timestamp for the requested assembly, which can help in determining if there have been any changes to the resource.   At runtime, the JavaScript resource is downloaded to the client.  

    The ASP.NET 2.0 Callback framework includes JavaScript content to support callbacks.   The JavaScript function which initiates and manages callbacks in the client browser is WebForm_DoCallback.  It creates an ActiveX object, Microsoft.XMLHTTP for Internet Explorer (pre 7.0) browsers or a native XMLHttpRequest object for other browsers to manage HTTP communication with a Web application on the server.  The Microsoft.XMLHTTP object is packaged with the Microsoft XML Document Object Model, part of the MSXML set of components.     

    The following code provides an example of the HTML content in an aspx page configured to work with callbacks.  The edits to the code involve two steps:

    1. Add an HTML element and a JavaScript function to create a callback request.  In the HTML code below, the click event of an HTML button triggers a call to the JavaScript function getServerTime, which in turn calls WebForm_DoCallback.  The message variable is set to ‘getservertime’ which is used by the server to determine which action to execute.  The server variable <%=sCallBackFunctionInvocation%> is translated to WebForm_DoCallback(‘__Page’, message, processMyResult, context, postMyError, true)at runtime.
    2. Add two JavaScript functions to process the callback response and update the page.  The processMyResult function takes the callback response string and updates the text content of a div tag in the HTML page.  Note, this happens dynamically so other objects in the page are not redrawn.  The postMyError function receives the callback message if an error was thrown on the server.  In this case, it pops up an alert box.
    <html>
    <head>
        <title>Untitled Page</title>
        <script  language="javascript" type="text/javascript">
            function getServerTime()
            {
               var message = 'getservertime';
               var context = 'Page1';
               <%=sCallBackFunctionInvocation%>
            }
    
            function processMyResult(returnmessage, context){
                 var timediv = document.getElementById('timelabel');
                 timediv.innerHTML = returnmessage;
            }
    
            function postMyError(returnmessage, context){
                alert("Callback Error: " + returnmessage + ", " + context);
            }
        </script>
    </head>
    <body>
        <form id="form1" runat="server">
            <input type="button" value="Get Server Time" onclick="getServerTime();" />
            <div id="timelabel"></div>
        </form>
    </body>
    </html>

    The following diagram illustrates a callback event at runtime.  The green circles indicate the order in which events occur to initiate and process the callback.  A short description for each step is provided below:


1. After the Web page loads, the onClick event of an HTML button is triggered which calls the user-defined getServerTime JavaScript function.

 2. The getServerTime function sets the message and context variables to be sent to the server and calls the ASP.NET 2.0 defined WebForm_DoCallback function to create and send the callback request.

3. A new XMLHttpRequest object is created to send and receive the asynchronous call to\from the server.

4. The XMLHttpRequest object posts the HTTP request to the server containing the message.  On the server, the RaiseCallbackEvent method parses the argument (message) and executes some business logic – in this case, it converts the time on the server to a string.  The GetCallbackResult method passes this string back to the XMLHttpRequest object waiting on the client. 

5. The ASP.NET 2.0 WebResource for callbacks directs the callback response string to the registered callback response function, the user-defined processMyResult function.

6. The processMyResult function uses the content of the callback response string to dynamically update HTML in the Web page.  In this case, it inserts HTML into an existing <div> tag to display the server time. 


How Postback works in ASP.Net

July 18, 2012

In this article, we will take a closer look at how ASP.NET pages post back to themselves, and how to customize this feature in our web applications.

function __doPostBack(eventTarget, eventArgument)

One of the most important features of the ASP.NET environment is the ability to declare controls that run on the server, and post back to the same page. Remember the days of classic ASP? We would create a form which would accept the user’s input, and then we would most probably have to create another page that would accept all those inputs, either through HTTP GET or POST, and perform some kind of validation, display and action. Sometimes, even a third page was necessary to perform our actions. This wasted a lot of time and complicated things when you had to make a change. But of course, this is not necessary any more with ASP.NET. There is no need to create second pages that accept the inputs of the first, process them and so on. Form fields and other controls can be declared to run on the server, and the server simply posts the page back to itself and performs all the validation, display and actions. Our life as web developers has become a million times better. But how exactly is this done?

When a control is declared to run on the server, a VIEWSTATE is created which remembers the ID of that control, and the method to call when an action is performed. For example, let’s say we input this HTML on a page:

01
02
03
04
05
06
07
08
09
10
11
12
<script language="VB" runat="server">
Sub Test_Click(ByVal sender As System.Object, ByVal e As System.EventArgs)
    'enter your code to perform
End Sub
</script>
<html>
<body>
    <form runat="server" id="myForm">
        <asp:linkbutton id="Test" runat="server" text="Create Text file" onclick="Test_Click" />
    </form>
</body>
</html>

This is a very simple page. We declare only one web control, a linkbutton, to run on the server, with an ID of Test and we assign a method called Test_Click to run when the link is clicked on the page. The linkbutton has to be wrapped inside a form that runs on the server as well. We save the above as an ASPX page and then we browse to it. The HTML that gets created looks like this:

01
02
03
04
05
06
07
08
09
10
11
12
13
14
15
16
17
18
19
20
21
22
23
<html>
<body>
 <form name="myForm" method="post" action="test.aspx" id="myForm">
 <input type="hidden" name="__EVENTTARGET" value="" />
 <input type="hidden" name="__EVENTARGUMENT" value="" />
 <input type="hidden" name="__VIEWSTATE"
 value="dDwtMTAwOTA0ODU1NTs7PsllCK1DzvZsK0J6OQ2dxKqmEwVs" />
  
<script language="javascript">
<!--
function __doPostBack(eventTarget, eventArgument) {
 var theform = document.myForm;
 theform.__EVENTTARGET.value = eventTarget;
 theform.__EVENTARGUMENT.value = eventArgument;
 theform.submit();
}
// -->
</script>
  
<a id="Test" href="javascript:__doPostBack('Test','')">Create Text file</a>
</form>
</body>
</html>

Our link calls the javascript function __doPostBack when clicked (that’s 2 underscore symbols in front of it). You do not write this function, instead it is generated by the ASP.NET engine and automatically included in our page. It submits the form to the same page, and accepts 2 arguments:

  1. eventTarget: the control doing the submission
  2. eventArgument: any additional information for the event

For example, our generated link button, is telling the javascript function that the control submitting the form is the one with ID=Test, and no further information is needed for the second argument. The javascript function is actually setting 2 hidden form fields with these 2 arguments: __EVENTTARGET and __EVENTARGUMENT. When the form is submitted back to the server, the server reads these 2 hidden form fields and decides what submitted the form and performs the necessary action. In this case, the server will determine that the linkbutton performed the action, and will execute the Test_Click method.

Lastly, I should point out that at least one control needs to be set to Visible, for the server to generate the __doPostBack function in our page. Even if we have numerous web controls declared to run on the server, but they are all set to Visible=false, then the javascript function will not be included and we will not be able to perform any actions. You can test this out, by changing the linkbutton source code to this and looking at the source code generated when it runs:

1
2
3
...
<asp:linkbutton id="Test" runat="server" text="Create Text file" onclick="Test_Click" visible="false" />
...