SharePoint stores most of the content it needs to serve up in the content database, so any time we can save a trip, we are helping the performance of our application.
So we will be examining the three types: BLOB cache, page output, and object cache. Page output and object cache require that you activate the ‘SharePoint Server Publishing’ feature located in the site features of your web site, so these will not be available to you if you are using SharePoint Foundation. BLOB caching, on the other hand, is available in the server product and will be where we start off.


BLOB Caching is a disk based cache. You configure it in the web.config file of the web site, which means that you will need to go to each WFE to set it up. Your web.config file is typically located at Local Disk:\inetpub\wwwroot\wss\VirtualDirectories\SiteFolder. Before making any changes to your web.config, you will need to back it up. It can be quite difficult to repair this file if you happen to make a mistake.
Inside the web.config file, find the following line:
<BlobCache location=”C:\BlobCache\14″ path=”\.(gif|jpg|jpeg|jpe|jfif|bmp|dib|tif|tiff|ico|png|wdp|hdp|css|js|asf|avi|flv|m4v|mov|mp3|mp4|mpeg|mpg|rm|rmvb|wma|wmv)$” maxSize=”10″ enabled=”false” />
If you are familiar with BlobCache from 2007, it works the same way. One nice thing about 2010, is that you get a very long list of file types that default to Blob cache as opposed to the previous version. I am going to save much of the explanation of Blob caching for the article written on TechNet: Plan for caching and performance. Once you have it set up, upload a few photos to a picture library and will see them populate the blob location.
In the root of your blob location, you will find a series of folders. Each of these folders represents the various web applications on your WFE. If you’re a little confused on which folder maps to which web site, simply check the Sites in your IIS Manager. The folder name is the Site ID.

In each of the sub folders is an additional folder and a file named currentcache.bin. If you rename the currentcache.bin file to a text file and open it up, you will see that it is the path referencing the cryptic named folder associated with it. Inside the cryptic folder, you will start to see the site structure of some of your content and additional bin files: change.bin, dump.bin, fulshcount.bin, filestodelete.bin, inprogressdump.bin, and oldcachefolders.bin.
change.bin: This file contains serialized change tokens (SPChangeToken) for objects being cached in the local file system. These tokens allow the BlobCache maintenance thread to query the content source(s) and subsequently update the contents of the BLOB cache with any items that are identified as having changed since the last maintenance sweep.
dump.bin: This file contains a serialized copy of the BlobCache’s cache dictionary. The dictionary maintains information for all objects being tracked and maintained by the BlobCache object; each key/value pair in the dictionary consists of a local file path (key) and its associated BlobCacheEntry (value).
flushcount.bin: This file contains nothing more than the serialized value of the cacheFlushCount for the BlobCache object. Practically speaking, this value allows a BlobCache to determine if a flush has been requested while it was shutdown.
One of the changes from MOSS 2007 and SP2010, is that the files use to be stored with a .cache extension. They now have their original description. Another change that I noticed is that the ‘Disk Based Cached Reset’ is no longer available, but you are able to flush the object cache.

One thing I was expecting is that if I went into the file system and deleted the files from the cache directly, that they would be populated on the next request. This was not the case. Once deleted, the files were still visible on the site. I was thinking that SharePoint was now going back to the content database to get these file, but I was wrong. I started up an instance of Fiddler to see if I could find these requests. These files are now being rendered by the cache of my web browser. When I deleted my temporary files, I found that the image no longer rendered. I tried several different ways to repair my site. I used the ‘Object Cache Flush’ to see if it had any influence on the BLOB cache. It did not fix my issue. In fact, I had to go as far as deleting all of the .bin files and toggle the web.config file to get the image to render again with blob cache enabled.

In MOSS 2007, we had a property called max-age. It allowed you to specify how long cached content would be valid in you blob location. This was measured in seconds, so I attempted to enter a value of “60″ to force my image to go back to the database. I wanted to make sure there weren’t any leftover references, so I once again deleted the .bin files, my image and toggled my web.config. The image was recreated in the blob location with a time stamp of 2:11 PM. I expected to wait a few minutes and refresh the page and get a new item in the blob storage location. This was not the case.
I did find some interesting behavior while playing around with the image properties. I found that if you have an image stored in the blob location and then change one of the properties, the image was updated leading me to believe that the max-age no longer works, but the SharePoint team has obviously set flags to check if the file has any changes and then refreshes the file accordingly. You may also notice that your image may not render until your browser cache is cleared.
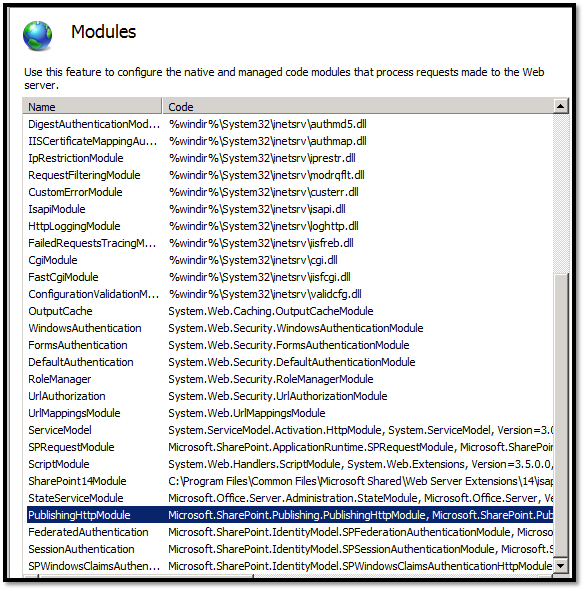
In my previous post, I mentioned the HTTPModules that get included in the HTTP request. While researching BLOB cache a little deeper, I found a very informative post by Sean McDonough, that states that BLOB cache is implemented by way of Microsoft.SharePoint.Publishing. This class is loaded in the PublishingHTTPModule. This means that while Blob cache does not require that publishing features be activated, it will not work in SharePoint Foundation. I went back to review the list of IIS modules to see where the PublishHTTPModule fell into the ordered list view. I have it highlighted in blue below.

As I mentioned in my previous post, the object and output cache options require you activate the ‘SharePoint Publishing Feature’ or as I like to call it, the Cha-Ching Feature, as it is normally where Microsoft puts its entire set cool features (i.e. caching, navigation, etc.).
So now that we have experimented a little with the BLOB cache, let’s move on to the output cache. Once you active the appropriate feature(s), you will find your caching options under the Site Administration and Site Collection Administration option of your SharePoint’s setting page.

The output cache is responsible for storing the output of a page. It has the capability to store various versions of the same page based off of parameters. An example of this would be caching pages based off of local area like zip codes. Like the other caching options, output cache can really improve the overall performance of your SharePoint implementation by eliminating the most expensive part of the request: the content database. In a previous post, I outlined the HTTP request. If you examine the steps, you will notice that having output cache enabled cuts out the majority of the hard work help to ensure that the end user is getting what they need without any latency. All though output cache can really help in all areas, it is extremely powerful when it comes to publishing pages with anonymous access enabled. In the world of caching, you don’t want to server your content contributors cached pages, since you want them to be able to review the latest and greatest. When it comes to anonymous users, it’s an entirely different story. Output cache stores the pages in RAM, so after the page is requested the first time, it is ready to rock and roll. The short story is… cache for anonymous and not for publishers. Show how do you separate the two? Caching profiles help you do just that, and in SharePoint 2010, they have improved quite a bit.
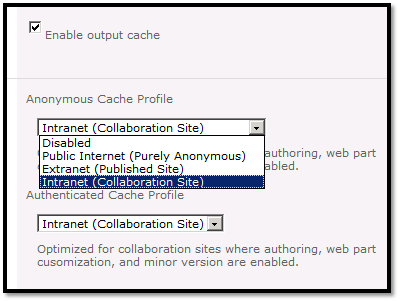
Once you click the ‘Output Cache Settings’ link, you will have the option to select the ‘Enable output cache’ checkbox. Under this you will notice the Default Page Output Cache Profile.
A cache profile specifies how long items should be held in the cache. It also describes to the caching system how to determine whether a cached page element is in fact valid for other requests for the same element from different users.
You can specify different cache profiles to use for anonymous and authenticated users. This optimizes the use of the cache based on the authentication methods allowed on the site.
Page output cache profiles specifically affect portal publishing pages.
So by default, you have four caching profiles to choose from: Disabled, Public Internet, Extranet, and Intranet.

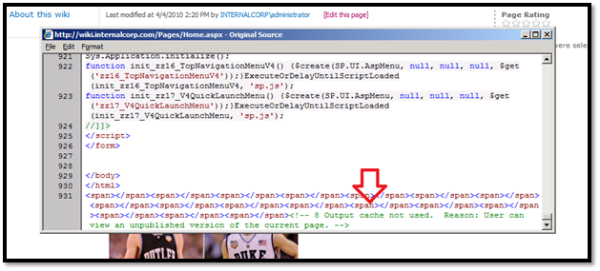
You also have the opportunity to specify a different caching policy for page layout designers and administrators and also specify whether or not you wish to collect Debug Cache Information. The debug cache information shows up in the source of your web page and will let you know which caching profile is currently enabled and when the information was saved.

Now we are going to take a look at a caching profile so that you can see how these guys work. We will focus on the Public Internet profile. Here you will see various properties that you can set. TechNet has an article on how to set many of the cache settings, but doesn’t go into caching profiles, so I will discuss these a bit.

Perform ACL Check – When this is set to ‘yes’, it will ensure that all of the items in the cache are properly trimmed for security by checking the access control list of the items. That sounds like something you might want to do all of the time, but remember this is an anonymous profile, and these visitor have limited to no rights.
Duration – This is how long the item will be cached for in seconds. The default setting is 180, so it’s 3 minutes.
Check for Changes – If this is set to ‘Yes’, SharePoint will check for changes in the page prior to rendering. So if you have this set, the duration doesn’t really add much value. If you want to keep your content for a specific amount of time, set this to ‘No’ and use the duration to its fullest potential.
Now we get to the Vary by parameters. These allow you to store multiple versions of the same page based off of specific values. You may have one cache setting for one HTTP Header versus another or based off of a Query String Parameter. Query Strings are represented in the URL by way of values after the ‘?’.
The Cacheability parameter specifies the devices that the object can be cached on. These are an enumerations are from HTTPCacheability (ASP.NET 2.0) and has six values, four that map directly to a Cache-Control HTTP header settings and two special values called HttpCacheability.ServerAndPrivate and HttpCacheability.ServerAndNoCache. ServerAndPrivate, the default setting here, allows a response to be cached only on the origin server and the requesting client. ServerAndNoCache means only the origin server.
Safe for Authenticated Use specifies whether or not an administrator can use this policy for authenticated users.
Allow writers to view cached content does exactly what it says. I don’t know of a good reason to use this one, but someone must have one, J
Ok, so that’s the run down on the caching profiles. Mix that with the output caching and you have a pretty powerful tool at your disposal.
Most of the caching options are only available to the Site Collection Administrator, but the Site Administrator does get the Site Output Cache option, which simply allows for overriding the Site Collection cache profile settings.
In my research for really trying to understand all of the caching mechanisms, I found a post called Measuring ASP.NET and SharePoint output cache. It’s short and sweet, so I will be applying these concepts to my virtual farm and make it the topic of my next post.
Content taken from :
http://shannonbray.wordpress.com/2010/04/04/digging-deeper-into-the-2010-caching-options-part-1/
Leave a comment